Wednesday, July 29, 2015

Channeling my inner Charlotte Olympia

This past April, I attended Pattern Review Weekend, in Los Angeles. Yes I am a total slacker and have been stalling on making this blog post ever since then.  Any-hoo... as a part of the weekend, there was a contest to make a handbag!

I love both challenges and handbags, and I love to make crazy stuff, so I decided to channel my inner Charlotte Olympia and get to work on a small bag shaped like a pincushion.


The outside is pieced leather over an interior plastic frame, and the pincushion men are made of silk samples that I purchased from Spoonflower and have cotton poplin heads. 


The interior is lined with quilting cotton.


Many people at the Pattern Review event asked how I made the bag, so here is the basic low-down.  

For the basic structure, I used a purse frame set, consisting of two plastic spheres and a hinged metal frame that the plastic pieces fit into. 

I attached a plastic disk (kludged together from cut-up sippy cup lids) to the bottom of one sphere so that my bag would have a flat bottom and I could attach feet to it (the feet went into the four holes).


Once I had the framework of the bag constructed, I made a pattern for the leather outside by smashing aluminum foil around the two bag haves (because I am fancy like that) and marking how wide I wanted the pieces to be. I needed five leather sections, so I measured around the edge of the sphere halves and divided by five, and then just drew a line up to the center point of each piece.


Once I had done that, I flattened and cut out the aluminum foil pieces and used them to make a pattern.
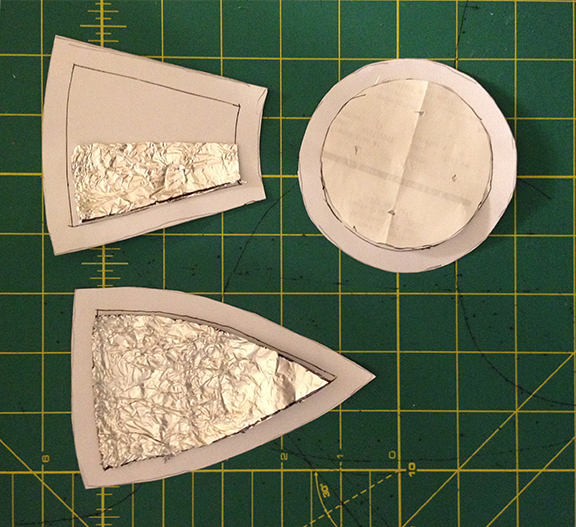

From there is was just sewing- I pieced the leather together and attached it to the plastic frames by drilling tiny holes around the edge of each frame (the plastic was very soft so I did this with an exact-o knife) and then sewing the leather cover to it.

To make them men, I printed their faces on cotton poplin using a laser printer (the ink will stay in place if you press it with an iron), and constructed their bodies out of printed silk squares.  Their construction is very simple- each corner of the square is folded right-sides together and sewn for a bit, and then the body is turned, stuffed, and a stitch is run through the middle of the body at the waist.


I attached the men to the sides by drilling holes into the plastic frame and sewing the on.

Voila- the most fun bag that I own!


Wednesday, April 1, 2015

Named Clothing Mai Zip Jacket

Just in time for spring (ok it is 85 degrees here)!


Varsity-style jackets have been very popular this winter, and when I saw the Mai Zip Jacket pattern on Named's website, I fell in love. 


For the body, I used a black and white plaid wool/cashmere blend coating, but since I am not a huge fan of the black and white plaid, I dyed it. This was pretty risky, since the fabric could have felted, shrank (although I did dye more yardage than I needed just in case), or the dye could have taken unevenly, but I lucked out and it came out great! 

I underlined the body with black silk organza, and used that to trace the pattern and pattern markings on to.  For the misc. smaller bits- the collar, zipper side pieces and pocket linings, I used some basic black wool.


The sleeves are leather, and although this was not my first time working with leather, this was my first time purchasing an actual hide, and that was fun! There is a leather store, LeatherWise, about an hour away from me, and although I was not able to go there in person, they gave me great advice on what to buy from them on-line.  They had many different color and texture options available, and it was tough to limit myself to just what I needed for jacket sleeves!


The lining is silk charmeuse quilted to lightweight quilt batting.  I wasn’t sure how this would work out; I was afraid that either the charmeuse would get ripples in it between the lines of quilting, or fluff from the quilt batting would get into my sewing machine and cause problems (I didn’t add a backing to the batting, as I was afraid that this would make my lining too thick). I made a generous test sample and found that the fabric/ quilting combo actually worked quite well- the batting is flexible enough that if the charmeuse rippled between rows you could just stretch out the batting in whatever direction you needed to fix it, and it also held together well and did not make a mess of my machine.


This jacket went together well- I had never sewn anything this complicated before so I did follow the directions carefully.  I hand-basted pretty much everything (lots of plaid to match up), and just took each step slowly and carefully.  I absolutely love it, and can't wait to make a summer version!


Monday, March 30, 2015

Simplicity Pencil Skirt


I am a lover of pencil skirts.  I love wearing them, and enjoy making them almost as much!  They are the perfect project- they aren’t too hard to make and they don’t take too long, and because they take only a small amount of fabric, you can go all out if you want to. I made this one in the fall, and it has been one of my favorites for the winter- honestly, it is hands-down the best fitting skirt that I own!

Skirt Front


I chose this particular pattern, Simplicity 1559, because I liked that the skirt was designed without a separate waistband, making for a very clean front.  I also liked that it had front darts- I have a bit of a belly, and skirts purchased off of the rack typically have a large gap at the waistband if they fit everywhere else- I knew that the darts could fix this.


I did deviate from the pattern a little- rather than using a folded vent at the back, I simply added a slit.  The fabric was a bit thick, and I think that the four layers of fabric that would have been involved once the layers of the vent were folded back on themselves would have been a bit bulky.

Skirt Back


The skirt fabric is an Anna Sui acrylic tweed, from Mood Fabrics. I like it because it is very textural and just a tiny bit wooly—perfect for our San Francisco Bay Area not-too-cold winters. I lined it with a coordinating china silk, and added petersham  (I love perersham!) at the waist for some extra support.  I hemmed it by hand- I am not the most confident of my silk machine-sewing skills!

Silk lining

Petersham Waistband


 Although pencil skirts are pretty quick and easy, this one did take a little extra time.  To match the pattern at the seams, everything had to be hand-basted together first, but because the threads making the fabric are so thick, it was easy to line up the pattern and make sure it was perfect by making each stitch between the same threads. And I got lucky on the pattern scale- it was just the right size that I could match it up perfectly on both sides of the skirt and at the back seam!

Side seam- lots of basting to get it to line up correctly!


Now that summer has arrived in Northern California (or at least it seems that way!) I need to get started on a summer version!

Also, a big shout out to anyone attending Pattern Review Weekend at the end of the month- I will see you there!


Saturday, March 28, 2015

Lace Top, Finished (a long time ago...)

After many hours of hand-stitching, I finally finished the lace top that I started in Susan Khalje's Couture Sewing School in July... in November.  I made sure to have it ready to wear on Thanksgiving, but it was a bit chilly that day so I ended up wearing a different sewing project (more on that later). Since then I have worn it several times- it looks great dressed up or down, and can be worn year-round!

Front
You can see that there are no seams visible, even though there are seams at the sides, the shoulders, and around the neck and bottom where lace edging was applied. 


Back
Again, no seams are visible.  Here, lace edging has been applied to each side of the back opening.


Side
On the sides, the seam runs down where you see a solid strip of the floral motif.


Back closures
For the closures, after much thought I decided to go with the simplest option- snaps.  I covered them with matching silk to make sure that they were well concealed.


Inside neck
Here is the inside of the neck- you can see where the extra lace was cut away underneath the edging so that it didn't show through from the outside.


Hand stitching

Here is a close up of hand stitching on a part of the edging as applied to the back opening- the hand stitching is on the right hand edge of the floral motif (stitching it to the netting).  Because the cording on the lace is stitched on by hand when it is manufactured, the added hand stitching is not at all noticeable.

Since August I have been doing lots of other sewing, which I will share over the next few days!